A couple of weeks ago, I published a post where I shared 6 reasons why you should build a get home bag ASAP. That post was pretty well received. Since manageable, attainable preparedness seems to be something you guys want AND something I’m passionate about, today, I’m going to show you how to build a get home bag.
But I’m going to take it a step further. I also want to help you plan your own get home bag no matter your budget (and I do want you to set a budget!).
My goal is to ultimately create a giant post on building a get home bag at 3 different price points, but that’s going to take me some time!
For this reason, today I will focus on how to build a get home bag for $60 or less.
Later, I’ll release additional posts that will help those of you who have bigger budgets and can build yours comfortably at higher price points! I might even create a walkthrough of my own get home bag…
Problems and Projects is a participant in the Amazon Services LLC Associates Program, an affiliate advertising program designed to provide a means for sites to earn advertising fees by advertising and linking to Amazon.com. This post may contain affiliate links through Amazon or other affiliate programs. If you make a purchase through an affiliate link, I make a small commission at no additional cost to you. All opinions are my own and I only recommend products that I believe in. Read my full disclosure here. Thank you for your support!
What Is A Get Home Bag?
First, just in case you’re new to the idea, let’s review what a get home bag actually is.
Very simply put, a get home bag is a stash of supplies which will help you get home safely if you should ever become stranded away from home. People usually keep it in their cars or carry it with them to work each day. Everything contained inside is meant to help keep you alive and get you home on foot, however long that might take.
A get home bag IS NOT a survival pack. It’s not meant to keep you going while you bug out in the wilderness. Although, I suppose if you’re skilled enough, it could! This type of bag should only hold enough supplies to sustain you for a day or two!
Yes, there are different types of preparedness packs. Check out this post to learn more about 3 different types of short term emergency preparedness kits you might want to build.
This type of preparedness bag should be lightweight, discreet, and hold only the most useful items. You’ll also want to cater it to your personal circumstances. My Texas summer get home bag probably won’t be very useful if it’s February and you live in Wisconsin.
Do You Really Need A Get Home Bag?
With rare exception, the answer is a resounding YES!!!
If you haven’t, check out this post where I discuss why you need a get home bag and why this is the best time to start building one! If time’s short, here’s a quick synopsis.
- We spend tons of time away from home. I know that’s not true for everyone right now, but as states reopen, eventually, you’ll go back to work, shop, travel, vacation, etc.
- You can’t predict the future. Severe weather, gridlock, car trouble, and dangerous situations can all occur without warning, leaving obstacles between you and your home.
- Your get home bag can help others in need. Maybe you’re not stranded. Unexpected emergencies happen to everyone. A well built get home bag can also help another fellow human.
- You might have some time before returning to work. Personally, I’ve been working virtually since mid-March, and I won’t likely return in person until at least August. Right now, I’ve got time on my hands to perfect my get home bag. It’s always better to prepare before the emergency, not after!
- Disruption is fresh on our minds. How many of you were totally prepared for COVID-19 to turn your life upside down? Me either. This is the perfect time to start building your get home bag because you know exactly where you under-prepared. If you forgot about it at home, you’d likely forget it here, too.
- Get home bags can save you money (and frustration) later. When you’re ready for emergencies, you don’t have to pay premiums for medicines/first aid/jumper cables/an entire manual breast pump set… You already have what you’ll need with you.
Want more emergency preparedness on a budget? Check out these posts.
- How to Prepare for Short Term Emergencies
- 120 Disaster Movies to Enjoy While Isolating
- How to Cope When You Don’t Have an Emergency Fund
- 6 Reasons to Build Your Get Home Bag Now!
- How to Get Out of Debt: A Step by Step Guide
- 15 Last Minute Gift Ideas That Save Money All Year
- 10 More Reusable Items That Save Money All Year Long
In a hurry? Click to pin the image below and save this post for later!
How To Build A Get Home Bag - The Basics
Now that you’re convinced, let’s talk about the process of building a get home bag.
Before you start filling up your shopping cart, there are several things you need to consider when deciding how to build a get home bag that’s perfect for you.
To begin, take a moment to think about these basic, but very necessary considerations.
1. Your Travel Distance and Terrain
What’s the farthest distance you typically travel from home? For most of us, it’s work. Find that distance and think about the terrain Is it city streets, highways, desert, woodlands, suburbs?
Now, think about what you’ll do if your primary path is totally blocked. Find a second route home! Now, how far would you have to walk, and what’s the terrain like?
For example, my commute is about 13 miles, almost entirely on the highway. If my path is blocked, double that distance, and add in a nature preserve. That’s what I have to be ready for!
If you’re never very far from home, you get to plan pretty light. You won’t need much if you’re always an hour’s walk from home. If you commute, like I do, you’ll need to consider how far you must go, how long that will take, and what types of landscapes you will likely traverse.
2. Your Physical Abilities
More than half the American population is obese and does not exercise regularly. I’m not trying to guilt you. I’m right there, too. In the worst shape of my life with a pre-existing heart condition.
I mention this because you need to realistically think about what your body can handle. How many hours, in optimal conditions, would your walk take? What’s the longest can you realistically go without food and water before your engine runs out of gas? Do you have life threatening medical conditions that will make your trek harder?
You simply can’t plan to haul around a 30 lb hiking pack for 15 hours if it’s a challenge to make it up the stairs.
Knowing what you need to help you survive and how much you can actually handle will help you prepare for your own specific emergencies, limit injuries, AND prevent wasting money on costly equipment that you end up abandoning half way home.
3. Common Emergency Scenarios
What’s most likely to actually happen where you live?
Let’s go back to 3rd grade social studies for a moment and think about where you live and work. Is it urban, suburban, or rural? If you’re in a densely populated city, your needs are different from someone who lives in a rural desert area.
It does no good to pack an earthquake kit if your area has never been hit by one. If your climate is always hot and rainy, then what good is a puffy, water logging winter jacket?
Here are a few things to consider.
- What type of community might you travel through?
- What are the most common natural disasters in your area? Do you know how to actually stay safe in them? Or are you relying on what you learn from disaster movies?
- Is your are densely or sparsely populated?
- Will you need to contend with people, animals, or the elements?
- What unexpected threats are more likely to strike your area?
4. Your Survival Needs
We’re getting close to the good stuff, now! Hopefully, you took the time to think about WHAT you’d survive. Now, it’s time to start thinking about how. In any survival situation, (and don’t be fooled, getting stranded and walking home IS a survival situation) there are 7 main categories you’ll need to plan for.
- Food and water – How will you maintain energy and stay hydrated without hauling too much weight?
- First aid – If you become injured, what will you need to treat the injury and keep moving?
- Protection from the elements – Can you protect yourself from the cold, sun, or weather? What will you do if you have to set up camp to rest?
- Directional tools – How will avoid getting lost? What will you do if you have to find a different path and you can’t Google it?
- Protection from animals and people – Can you defend yourself against insects, wild animals, or unsavory characters?
- Hygiene – You won’t be stopping to take a shower, but how will you keep wounds clean, avoid disease, or use the bathroom?
- Type of bag – Finally, you need to plan for how you’ll carry your haul around with you. I put this last on purpose. Think about all the stuff you plan to store. That will determine how big your bag should be. Remember, smaller is better.
Now, You're Ready!
Okay, now you know what a get home bag actually is and why you need to start one. You’ve learned about 4 major considerations when designing your bag, and you’ve realistically thought about your needs and budget. It’s finally time to start talking about how to build a get home bag.
The next section contains ideas for items you should consider in each of the 7 major categories. Assuming you start with almost nothing, you can use this list to help you build your own get home bag for around $60. The more items you pull from home, the cheaper your bag will be! Also, the closer to home you are, the cheaper your bag can be because you won’t need quite as many items.
How To Build A Get Home Bag For $60.
I’ll be straight with you. $60 is not going to build you a get home bag with all the neatest gadgets and cool tactical equipment you see on Doomsday Preppers.
But I’ve got some good news. You CAN build a decent get home bag with a small amount of money. Even better? In real survival situations, it’s rarely the person with the best toys who survives. It’s the person with the greatest ability to creatively problem solve and stay calm.
Don’t get me wrong, the toys do help, but only if you have your wits about you and actually know how to use them. For this reason, you should feel free to make substitutions at will. This is just a list of suggestions and ideas. It’s not the law!
Since your budget is small, you should also source as many items from your home as possible and focus on multipurpose equipment. The money you save can be used to grab some other essentials you might want to include!
Food And Water - $8 to $21
Most of us can survive for days to weeks without food, but we get 3 days at best without water. Even less in extremely hot or cold climates and when you add manual labor to the mix.
Food is the least important part of your bag. Hopefully, you’re able to get back home in under 24 hours. You want something to take the edge off, but leave the MRE’s and camp stoves for another day.
When adding food to your bag, keep it light, portable, sturdy, and cook-free. You want something with carbs and sugar for energy, protein to keep you going, and fat to help it last longer.
Prices are approximate based on my area (North Texas) at the time of publishing this article, though I’ve linked every product possible through Amazon or Walmart.com to help you do your own research!
FOOD $4 - $7
- $4 Stuff 3-4 Clif bars in your pack, OR stop at the dollar store and get a couple bags of jerky and a couple bags of trail mix.
- $3 (Optional) If you lose energy quickly, and you’re going a long way, grab a couple energy gels or Honey Stingers for an emergency. They’re life savers for people like me with low cardiovascular stamina who burn through energy quickly.
WATER $4 - $10
- FREE – $1-$2 1-2 liters (depending on distance) of water in liter bottles from the store OR in reusable 1 liter bottles you already own. Bonus if the bottle is stainless steel because you can boil water to purify it!
- $10 Water purification tablets and a bandana (I buy packs of 2 at my local Dollar Store). Filtration straws are cool, so grab one if you can. But when money’s tight, this is the cheapest way to go. The tablets purify 50 liters of water, (that’s why you got a liter bottle!) and the bandana filters out particulate matter. This won’t handle chemical biohazards, so use good judgement if you have to purify and filter water!
- $4 If you’ll travel through cities or towns and believe you’ll have access to potable water, you could take a risk and grab a sillcock key instead. This gives you access to water from outside a building, even if it’s shut off.
First Aid - FREE to $6
Personally, I recommend building your own Firs Aid kit. The pre-made ones are always just a bunch of bandages. Since money is a factor, I highly recommend raiding your medicine cabinet first! Then, hit up a Dollar Store and build a cheap kit. Keep it in a makeup bag you already have or a sturdy zip top freezer bag. Here are a few basics!
- $1 Assorted bandages
- $1 Some blister pads or a little moleskin.
- $1 tweezers
- $1 triple antibiotic ointment
- FREE A couple days worth of your chosen painkiller, allergy medicine, or any life saving medications you require – pull from what you already use at home.
- FREE A needle and some thread – most of us have this lying around.
- $1 gauze pads
- $1 tube of lip balm
Protection From The Elements - $9 to $19
You’re pulling the vast majority of this section from your own closet! Consider the weather in your area. Do you need to deal with sun, rain, heat, cold, snow, etc?
CLOTHING – FREE
- One lightweight set of seasonally appropriate clothing.
- A spare jacket if you have it.
- A billed hat for sun protection with a bandana or old shirt to protect your neck or sunhat.
- Spare winter gear, such as blankets, gloves, scarves, or warm hats.
- A spare change of socks and underwear.
- A comfortable pair of shoes (throwaway shoes are great here).
- $5 Fire. A couple lighters AND waterproof matches (dip regular matches in wax or get them here) or a Ferro rod (make sure you know how to use it beforehand!) Handy tip: Cotton balls soaked in Vaseline, lip balm, and crayons all burn well, and you probably already have them at home!
- $1-$4 A rain poncho is nice if it’s likely to rain in your area. A trash bag with holes cut in it is a mediocre, but free, alternative. Hit up the Dollar Store, or check here.
- $2 Depending on your area stash one for emergencies.
- Hot Hands for warmth
- Frogg Togg cooling towel to help stay cool
- $1-$5 Flashlight – You’re in luck because you can get these for a buck, too. I couldn’t find that price online, but my local Walmart carries tons in the camping section. They’re not amazing, but they’ll do the job! Online, the closest decent one I found is this $5 tactical flashlight.
- $4 Mylar emergency blanket – Skip this if you’re in a hot climate or upgrade to a nicer one. These cheapies will fall apart on you after one use, but if you’re freezing and know how to use them, that one usage could keep you alive.
Directional Tools - FREE to $16
You should work under the assumption that you won’t be able to “just Google it” in an emergency. What happens if your phone dies or the grid is down? You also might have to find an alternate route home without the help of technology. Fortunately, you don’t need much. A map to help guide you and a basic idea of which direction you should be heading can make a world of difference.
- FREE – $10 A map of your area – make a trip to your local visitor center or hit up the internet and print out maps. Protect them from the elements by laminating or storing in a waterproof bag. Know how to read it. If you live in a major city, you can also find laminated city maps from $2-$10 on Amazon.
- FREE-$6 A compass OR learn how to identify direction using the sun/local clues.
- $6 Get one of these survival bracelets, and add a flint rod, whistle, small saw blade, and paracord to your bag.
Protection And Personal Safety - $8 to $24
- Cash As much as you can scrape up. More is better, but make sure you at least have enough for a phone call, a few gallons of gas, and some food or water. Also, make sure it’s in small bills, including a couple dollars in quarters.
- $2 Some bug repellent bracelets (found at my local Walmart and much cheaper than travel bug spray)
- $6-$15 If you’ve got it in the budget, a decent multi-tool, pocket knife, or survival tool can be incredibly helpful when protecting yourself. Here are some options for you. After building your bag, grab the one you’ve got money for.
- $6 Belursus 11-in-1 wallet tool with foldable wallet knife – These nifty little tools fold up to fit in your wallet and weigh next to nothing. You get a fold-up straight edge knife and a tool that has a can opener, knife edge, screwdriver, ruler, bottle opener, 4 position wrench, butterfly wrench, sawblade, direction ancillary indication (makeshift compass) and a 2 position wrench.
- $12 Ozark Trail 12-in-1 Multitool includes long nose and standard pliers, wire cutters, a knife, bottle opener, can opener, an awl, a file, a saw, and 3 screwdrivers.
- $15 Rose Kuli 7″ Multitool – More expensive, but offers a different variety of tools. You get a hammer, hatchet, pliers, wire cutter, knife, wood saw, phillips head srewdriver, wrench, nail file, and bottle opener.
- $7 If blades and hammers aren’t your thing, pepper spray will also keep people and animals away long enough for your to make a break for it.
Hygiene - $3 to $13
You don’t need a complete shower kit for this bag. Remember, your get home bag is only designed to get you through 24-36 hours.
BASIC HYGIENE $3 – $4
- FREE – $1 A bar of soap – Raid your bathroom for hotel samples. It only has to last one day!
- $1 Hand sanitizer or rubbing alcohol
- $1 A travel pack of tissues or toilet paper. You can use leaves, your hand, or a bandana, but I wouldn’t want to if I didn’t have to.
- $1 A travel pack of wet wipes or baby wipes.
- Free A couple hair ties if needed. If you have long hair, then you already have these!
- FREE – $9 Ladies, we all know that Aunt Flo’ doesn’t cater to convenient timing. If you’re a menstruating women, you should always have a day or two’s worth of period products. Personally, I love menstrual cups. The market has exploded with affordable options recently! Don’t try to learn how to use it in the woods, though. There’s a small learning curve, but you can absolutely use a cup out in the world with a hole in the ground and a water bottle. I know this because I’ve done it. (Thanks Spanish meseta and your lack of towns for 20 miles)
- $12 Optional, but highly recommended is a female urination device. This one is my personal favorite, though there are cheaper options. It allows you to pee without squatting, thereby eliminating accidentally peeing all over your pants or shoes. It also rinses easily with some water. Bonus: This thing also rocks when using repulsive public bathrooms!
A Bag - Free to $13
Hopefully, you can just grab an old bag you have at home, and save a good chunk of change!
You have lots of options when it comes to bags, each with its own benefits and disadvantages.
- Messenger or sling bags – They’re discreet and accessible on the go, but they’re hard on the shoulders after a while.
- Hip belts – They’re easy on your back, but only hold a small amount of stuff
- Tactical bags – They hold a ton and organize easily, but they’re conspicuous and could make you a target.
- Hiking packs – There are tons of options, but they tend to cost more.
- Hydration packs – Designed to hold water, lightweight, and often cheaper, but they don’t hold much else.
- Backpacks – Totally inconspicuous, but they can be tougher to carry for long distances.
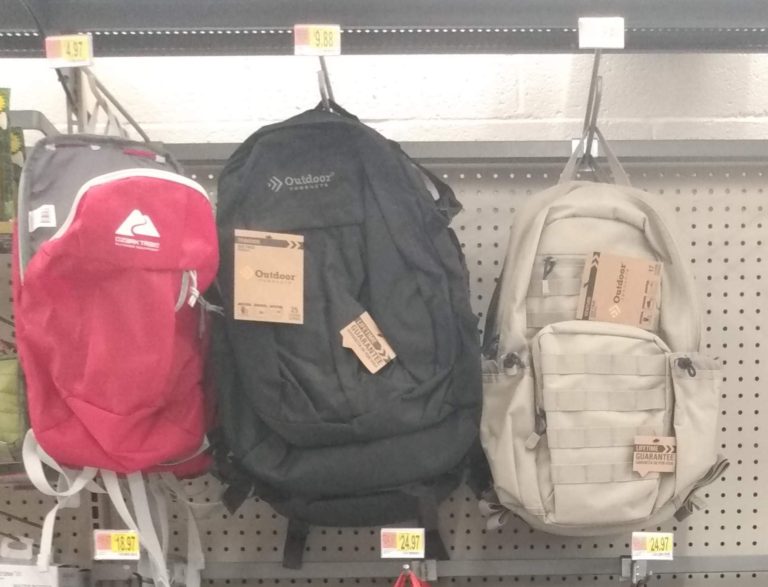
If you prefer to look online, here are some options I found for under $15.
- $5 18L Ultra lightweight collapsible backpack – Water resistant and very lightweight, also one of the cheapest options I’ve seen.
- $10 Outdoor products 25L traverse backpack – Lots of storage space, plus, the only bag on this list that has a hydration bladder compartment!
- $10 Gonex Men’s Military Messenger Sling Bag – A small military style sling bag for carrying small loads short distances
- $11 Gonex 35L lightweight travel daypack – another hiking pack with lots of organization. This is the largest bag on this list.
- $13 Camel Crown 30L lightweight hiking backpack – Lots of compartments for organization and a chest strap to help with weight distribution.
Now You Know How To Build A Get Home Bag!
When you break it down into small, manageable pieces, you can see that it’s not too challenging to figure out how to build a get home bag. You can even do it with a small budget!
Notice that there’s nothing here about your car. Getting your car running again should always be your first priority! However, that’s a different process altogether.
Read this post to see some recommendations for putting together an emergency car kit. You’ll find a lot of similarities between car kits and get home bags, so if you already have one, you’re halfway to owning both!
Well, have you built your get home bag yet? What do you think is the most important item? How much did you end up spending? Let us know!
Don’t forget to sign up for our newsletter. That way, you won’t miss more budgeting tips and conquered challenges!


These are some great tips. I’ll be honest, I’ve never bothered with a get home bag due to the fact that I am literally home all the time. I work from home, so I don’t go far. Also, we’re a 1 car house and my husband takes the car for work – if I want to go somewhere during the week, it has to be walking distance. That being said, I have never considered having something like this for the car specifically. I should set one up that would take care of both my husband and I, both for his work commuting but also for our random road trips!
Everyone’s situation is different, and it totally makes sense that you might not need done. Creating one for the car in road trips is a great idea, though!
What a great and extremely detailed post! I have a small and crappy get home bag in my car, but I always miss something when I need it! So this post was highly valuable for me, and I’m definitely going to change update and renew my whole bag! Thanks for sharing the knowledge 🙂
Even a small, crappy one is better than nothing! I hope this information helps you build an even more useful one!
Hi Mrs P&P. I’d never heard of a ‘get home bag’ before so this was quite educational for me. Certainly something I’m going to look into for me and OH.
I’m glad I could teach you something new!
Love this idea! Never thought of having one of these in my car but it’d be very beneficial to have one.
Mine has certainly come in handy
I have a 72 hour kit in my car, but after looking at your suggestions, I realized there are still some things I should probably include. Thanks for another great post!
Glad it was helpful!
Very good advice I do this already
But some of the tips will help.
I dont think many was ready for this pandemic.
But people should follow this advice as many people just have no knowledge on what to do etc. So this post will be a big help.
https://www.wattophotos.co.uk
It definitely caught a lot of us by surprise. I hope this information helps lots of people be ready for emergencies.
I’ve never heard of a get home bag. I wouldn’t have guessed it was different from a survival bag, but now I understand. I’m going to share this post. Thanks!
Much appreciated! I’m glad it was useful information. The two bags have a lot in common, but you’re right, they have a different the goal!
I used to do a 3-hour round trip daily commute on public transit. My must-haves to carry with me were definitely a snack, pain meds, band-aids and tissues.
Those are great basics to have in hand at all times!
Oooh I’ve never heard of this before, but I’m definitely feel like I need one right now.
Love, Amie ❤
The Curvaceous Vegan
It was probably the last thing I put together, but it comes in very handy.
Lots of awesome tips in here and a lot I had never considered. Thanks for sharing!
Glad you enjoyed it!
I never really thought about the importance of this until now. Thanks for showing! I’ll be making one myself when I have time this weekend, because this is a big thing. Especially with my car not starting a bit ago.
There’s nothing like a real life emergency to help convince you to prepare. I hope everything worked out ok.
I never really thought about the importance of this until now. Thanks for showing! I’ll be making one myself when I have time this weekend, because this is a big thing. Especially with my car not starting a bit ago.
I never really thought about the importance of this until now. Thanks for showing! I’ll be making one myself when I have time this weekend, because this is a big thing. Especially with my car not starting a bit ago.
This is a great, common-sense idea. I’ve never heard of a get home bag! I need to get one together while I prepare my home emergency kit.
Now is the time! Glad you liked it!
I’d never thought of the concept of a “get home bag” before. Thanks for breaking down the items and cost here. It really helps make it seem attainable. I have some basic supplies in my car, but nothing compared to what you’ve suggested. I’ll have to do an inventory and see what to add!
Even a few basic supplies is better than nothing! I built mine with a long walk and the worst case scenario in mind, (I think this year’s got me traumatized!) but that might not be necessary depending on your situation.
Love this idea! I know a few people who keep a bag in the boot of their car just in case! It’s good to know you can make a decent bag for so cheap too! Thanks so much for all the advice and the break down of some of the pricing, it’s a big help!
I’m glad it was helpful! Make sure to do a sweep around your house. I bet you can bring the price down even more!
Honestly had never heard of a get home bag before I read this! Found this super interesting and informative. I personally really only keep a first aid kit in my car but I think now I’ll be adding some trek bars and trail mix just in case! Thanks for making me aware of this and getting me prepared. Such a unique post!
Get home bags were one of the last things I discovered, but I couldn’t believe I didn’t think about it sooner! I’m so glad you’re able to use this info to help get prepared!
I LOVE this idea – now that you bring it up it seems like an essential idea!!
Glad you agree!
I have some of this bagged up but have more work to do!
Good luck!
I feel like I need one now! I never heard of a “get home bag” before this post so thank you for sharing!
It was one of the later this I liked about, too, but so important! Glad I could help.
This is such a great post. I remember your last one about why you should have a get home bag. This is a great follow up to it and I love how you outlined it for $60 or less!
Thank you!
I didn’t even know what a “get home bag” was until I clicked on your post. And now I’m thinking this is something we ALL should have! This is a great post. Thank you!
I’m so glad it was helpful to you!
Wow, quite a thorough post. I think I’d better investigate organizing a bag w necessities! Thanks so much for the inspiration.
I’m glad I could inspire you to get prepared!